

Have you got an old, rotting, or unused garden shed taking up valuable space? Whether you’re planning to replace it, relocate it, or just want your garden back, removing a shed might be easier than you think.
Many UK homeowners assume shed dismantling is a job best left to professionals, but with the right plan and tools, you can take on the task confidently. In this guide, you’ll find a practical, step-by-step approach to safely and efficiently remove a shed.
We’ll walk through everything from preparation to disposal, covering potential pitfalls, costs, and when to call in help. Whether you’re working with wood, metal, or plastic, and whether you plan to demolish or relocate, this article is your go-to source for a smooth shed removal process.
Why Might You Need to Remove a Shed in the First Place?
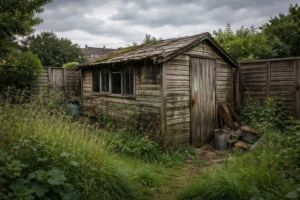
There are several reasons why UK homeowners consider shed removal. Perhaps your shed is collapsing from rot or damp, or the roof has started to leak beyond repair. Maybe the structure was poorly installed, or it has become a dumping ground rather than a useful storage space.
Sometimes, it’s simply about reclaiming garden space or preparing for a new structure like a summerhouse, greenhouse, or decking. Old sheds can also attract pests, especially if they’re unused, and in some cases, they lower the overall appeal of your outdoor area.
Other times, the decision to remove a shed comes with a house move, when you want to relocate it or leave the property looking clear and tidy. Whether for aesthetic, practical, or safety reasons, shed removal can be the first step towards a better, more organised garden.
What Should You Know Before Touching a Single Panel?
Before dismantling even the smallest shed, it’s essential to plan carefully. Start by assessing the condition and materials of the shed, wood, metal, or plastic each has different removal challenges. Check for visible damage, mould, or signs of pest infestation.
Make sure to consider the space around the shed. You’ll need room to work and move panels safely without damaging nearby fences, plants, or buildings. Identify how the shed was built, some are screwed together in sections, while others are nailed or glued. If you’re unsure, take photos of connections and joinery for reference.
Key things to check before starting:
- Is the roof intact or sagging?
- Are there electrics or plumbing connections?
- Are the walls bolted, screwed, or nailed?
- Is there a solid base such as a slab or concrete?
- Are you planning to reuse or dispose of the shed?
Also, notify any nearby neighbours if you’re working close to boundaries. Respecting their awareness of noise or access disruption will help avoid complaints.
What Tools and Protective Gear Will You Need for the Job?
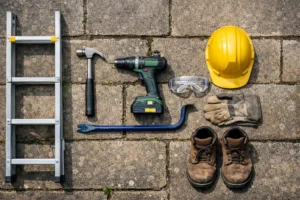
Having the right tools ready makes shed removal safer and faster. Most sheds can be taken apart using standard hand tools, but some will need power tools depending on construction.
Here’s a breakdown of the essentials:
| Tool / Equipment | Purpose |
| Claw hammer | Removing nails, pulling apart timber panels |
| Cordless drill/screwdriver | Unscrewing doors, panels, roofing |
| Pry bar or crowbar | Separating nailed sections, lifting floorboards |
| Reciprocating saw | Cutting through tough or rotting sections |
| Ladder | Reaching roofs or tall structures safely |
| Heavy-duty gloves | Preventing cuts and splinters |
| Safety goggles | Protecting eyes from flying debris or dust |
| Hard hat | Essential for roof work or falling panels |
| Dust mask or respirator | Shielding from mould or dust particles |
| Labelled bags or containers | Organising screws, bolts, and fixtures |
Make sure your tools are fully charged and in working condition. Preparing your safety gear in advance will prevent last-minute disruptions.
How Do You Safely Deal With Electricity or Plumbing First?
Many modern sheds have been upgraded with electric lighting or even water supply. If yours is wired or plumbed in, do not begin dismantling until these have been fully and safely disconnected.
Start by checking:
- Are there visible sockets, light fixtures, or switches?
- Does wiring feed from the main property or a separate source?
- Is there any exposed conduit, cable, or junction box?
Follow these safe disconnection steps:
- Switch off power from the main fuse board.
- Use a voltage tester to confirm there’s no live current.
- Isolate water supply from valves if plumbing is present.
- Cap off any exposed wiring or pipes safely.
If you’re at all unsure, hire a certified electrician or plumber to disconnect these for you. It’s far safer and avoids fines under UK electrical safety regulations.
How Do You Remove a Shed Step by Step Without Breaking a Sweat?
When done methodically, removing a shed can be a surprisingly manageable job. Let’s walk through it step by step, following a safe and logical order that prevents structural collapse and helps with clean-up.
Step 1: Empty and Inspect the Shed
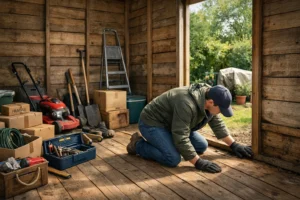
Clear everything out of the shed, including tools, stored items, hooks, and shelves. Check for loose floorboards, pest damage, and any signs of structural weakness like soft walls or a sagging roof. Make a note of reusable items and dispose of anything broken or hazardous. This inspection ensures nothing is in the way when dismantling begins.
Step 2: Remove Windows and Doors
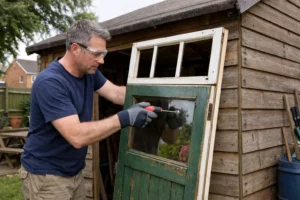
Start with the most fragile parts. If your shed has windows, tape them with duct tape in a cross pattern to prevent shattering, then carefully remove the glass panes. Unscrew or unbolt window and door frames. Doors are often heavy, so have someone support them while removing hinges. Place hardware like locks and hinges in labelled bags if you intend to reuse them.
Step 3: Strip and Take Down the Roof
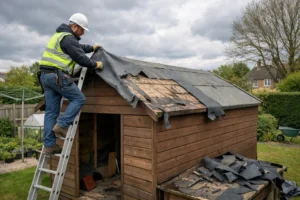
Begin by removing the roof covering. For felt roofs, use a claw hammer or pry bar to strip it back. With metal or shingle roofs, unscrew panels from the edges inward. Once coverings are off, unscrew the roof panels themselves. Always dismantle from top to bottom, and work with a helper when removing large or heavy sections. This prevents panels from crashing down.
Step 4: Dismantle the Shed Walls
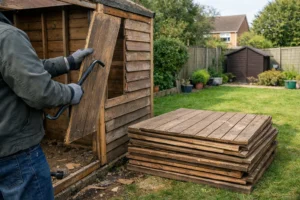
Next, turn to the wall panels. Start at one corner and remove them in order. If they’re nailed, a crowbar will help. If they’re screwed in, a cordless drill speeds things up. Older sheds may have warped wood, so take care when pulling panels free. Temporarily support walls using spare timber if needed to prevent unexpected collapse.
Step 5: Lift Out the Floor and Base
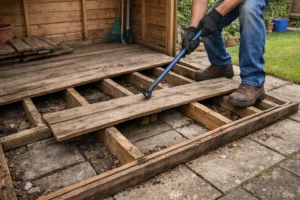
With the walls removed, you’ll be left with the base. Wooden floors are usually screwed down. Remove all fixings before prying up each section. Some bases sit on bricks, slabs, or full concrete. Timber frames can be dismantled, but concrete bases may be left in place or broken up using a sledgehammer. Clear away all loose nails and debris before moving on.
How Should You Dispose of Shed Materials in the UK?
Once your shed is taken apart, you’ll be left with panels, roof felt, nails, insulation, and sometimes wiring. In the UK, disposal must follow specific routes to stay legal and eco-friendly.
Your main options include:
- Booking a council bulky waste collection for large panels.
- Hiring a licensed skip (check permit rules if placed on public land).
- Taking wood, metal, and plastic to local recycling centres.
- Hiring private waste removal companies (always check Environment Agency registration).
- Donating intact sheds or panels via Freecycle or Facebook Marketplace.
- Repurposing timber for garden projects, firewood, or compost bin builds.
Dispose of roofing felt and electrical parts responsibly, as these are often not recyclable. Avoid fly-tipping at all costs; penalties in the UK can reach £50,000 or higher.
How Much Time and Money Should You Expect to Spend?
Planning your time and budget can help avoid unnecessary surprises during shed removal. The duration and cost can vary widely based on shed size, materials, foundation type, and access to the site.
Shed removal time and cost breakdown:
| Shed Size / Type | Average Time (DIY) | Professional Removal Cost Range |
| Small Wooden Shed (4×6 ft) | 1–2 hours | £65 – £235 |
| Medium Shed (6×8 ft) | 3–5 hours | £140 – £400 |
| Large Shed or Summerhouse | 1 full day | £350 – £950+ |
Other influencing factors:
- Base Removal: Concrete or slab bases add to labour costs.
- Rot or Damage: Weak structures may take longer to disassemble safely.
- Contents Clearance: Some services charge extra for internal contents.
- Access Difficulty: Narrow paths or no side gate can increase cost.
Hiring a pro can speed up the job, especially if waste disposal is included. However, DIY removal can be cost-effective if you have time and tools.
Is DIY Shed Removal Always the Best Option?
Removing a shed yourself is often practical, particularly if it’s a small or medium-sized wooden structure with no electrical connections. It allows you to work at your own pace, avoid scheduling issues, and significantly reduce labour expenses. For homeowners who enjoy hands-on projects, DIY shed removal can even be a satisfying weekend task.
However, not all removal jobs are suited for DIY. If the shed is large, built from metal, contains electrical wiring or plumbing, or has suffered structural damage from rot or pests, the risk of injury increases. These complexities demand not just time but specific tools, experience, and sometimes physical strength that not everyone has access to.
Additionally, without the right safety gear or disposal knowledge, DIY removal may end up taking longer than expected or result in improper waste handling. If you’re on a deadline, lack help, or aren’t confident with ladders and power tools, hiring a professional might be the more efficient and safer route.
What to Expect From a Professional Shed Removal Service?
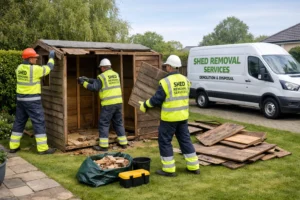
When you hire a professional shed removal service, you’re not just paying for labour, you’re investing in efficiency, compliance, and safety. These teams arrive with all the tools, protective equipment, and expertise needed to dismantle and dispose of your shed correctly and swiftly.
A standard service includes full dismantling of the structure: the team will methodically take down the roof, remove doors and windows, disassemble walls and lift out the floor. Many companies also offer base removal, especially helpful if you’re planning to rebuild or re-landscape the area.
You can expect professionals to:
- Bring all required tools and equipment
- Handle waste separation and loading
- Transport materials for legal disposal or recycling
- Clean the site after completion
Pricing typically includes travel, disposal fees, and insurance. Reputable services are registered with the Environment Agency and hold public liability insurance. Some may also offer extras like skip hire, contents removal, or site levelling. When comparing quotes, always check for included services and look for verified customer reviews.
What Are Common Mistakes People Make When Removing a Shed?
Shed removal may seem straightforward, but even experienced DIYers can make critical errors. Avoiding these mistakes can save time, prevent damage, and reduce injury risks.
Here are some common pitfalls to watch out for:
- Starting with the walls instead of the roof: This destabilises the structure and can lead to sudden collapse.
- Failing to disconnect electricity or plumbing first: This can be dangerous and may violate safety regulations.
- Not wearing protective gloves, boots, or eye gear: Splinters, nails, and debris can cause painful or serious injuries.
- Letting large panels drop without control: These can damage paving, fencing, or injure someone nearby.
- Improper waste disposal: Dumping materials without checking local recycling rules can result in heavy fines or legal issues.
By planning the removal in a logical order, using the right tools, and prioritising safety, you’ll reduce these risks significantly. Take your time, stay aware of your surroundings, and don’t hesitate to seek help if you’re unsure at any point.
What Comes Next After the Shed Is Gone?
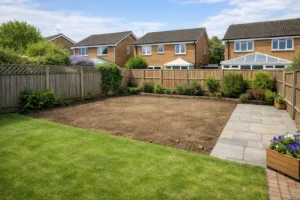
Once the shed has been successfully removed and the area cleared, you’re left with a valuable open space, ready for new ideas and opportunities. But before rushing into your next shed, some post-removal preparation is essential.
Here’s what to do next:
- Clear the ground of all leftover nails, screws, or sharp debris
- Level the soil or replace any disturbed paving stones or slabs
- Check for signs of poor drainage, water pooling, or pest activity
- Inspect for rot or damp patches where the shed base once sat
Decide how you’d like to use the space. Will it house a new shed, garden room, patio, or perhaps a greenhouse? Maybe you’ll convert the area into a seating area, play space, or lawn extension. If installing a new structure, ensure the base is stable and moisture-free before laying fresh foundations.
Taking time to restore and assess the ground helps avoid future issues, ensures your next installation lasts longer, and gives your outdoor space a clean, usable finish.
Conclusion
Shed removal doesn’t need to be overwhelming. With a structured approach, the right tools, and a focus on safety, you can clear that old structure from your garden efficiently. Whether you’re doing it yourself or calling in professionals, understanding each step, from disconnection to disposal, makes all the difference.
Think of shed removal as a fresh start. Reclaim your outdoor space, avoid costly errors, and transform your garden into something more useful, safe, and appealing.
If you’re short on time or simply want the job handled swiftly and responsibly, our rubbish removal services are here to help. We offer full shed dismantling, clearance, and disposal, all handled by licensed professionals who understand local regulations and environmental responsibility. Let us do the heavy lifting so you can enjoy your garden, stress-free.
FAQs
Do I need planning permission to remove a shed in the UK?
Generally, no planning permission is required to remove a garden shed. However, check with your local council if your property is listed or in a conservation area.
How long does it take to remove a shed?
A standard wooden shed typically takes 2–5 hours to dismantle with the right tools and help. Larger or more complex sheds may take a full day or more.
Can I reuse the materials after dismantling the shed?
Yes, many shed parts like timber, windows, and doors can be reused or donated. Just ensure the materials are in good condition and free from rot.
Is shed removal dangerous?
It can be, especially when dealing with electrics, heavy panels, or rotting structures. Proper safety gear and careful handling are essential to avoid injury.
What should I do with the waste after shed removal?
You can take it to a local recycling centre, book a bulky waste collection, or hire a skip. Be sure to separate wood, metal, and other materials properly.
Can I remove a shed alone?
While possible for small sheds, having a second person helps with lifting, stability, and safety. Working alone increases the risk of accidents, especially during roof removal.
How much does professional shed removal cost in the UK?
Prices range from £65 for small sheds to over £900 for large, complex structures. Costs depend on size, materials, base type, and accessibility.


