

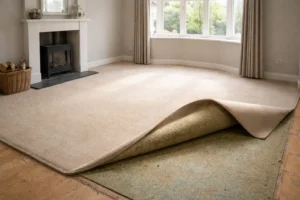
Are you planning to refresh your home with new flooring? Whether you’re upgrading to hardwood, laminate, or vinyl, one task stands in your way, removing your old carpet. For many homeowners in the UK, carpet removal feels like a daunting chore. But the good news is, you don’t always need to call in the professionals.
With the right tools, safety gear, and a step-by-step approach, you can lift, roll, and dispose of your old carpet yourself, saving both time and money. From preparing the space and using the proper technique, to knowing how to handle gripper rods and what to do after removal, there’s a lot to think about.
That’s why this comprehensive guide will walk you through every detail of carpet removal, from planning to disposal, making the process smooth, safe, and stress-free. Let’s help you take the first confident step toward your new flooring project.
What Should You Know Before Removing Carpet Yourself?
Before you pull up a single corner, it’s essential to understand the layers and attachments involved in carpet installation. Most UK carpets are installed over a foam underlay and secured with gripper rods along the edges.
Some may also be glued down directly, particularly in older properties or on stairs. You’ll be removing not just the carpet itself, but underlay, grippers, and any leftover adhesives.
DIY carpet removal is very achievable, but it does require physical effort, a bit of patience, and a clear disposal plan. You’ll also want to consider any allergies or sensitivities, as disturbing old carpets can release trapped dust and fibres.
Assess the condition and fixing method of your carpet to decide whether you can manage it alone or need help. If your carpet is stapled, glued, or covering multiple awkward spaces, extra effort will be needed. But for most homeowners, a weekend DIY job is more than doable with the right steps.
How Do You Prepare a Room for Carpet Removal?
Preparing your room properly makes the removal process much more efficient and safer. Start by clearing the space of all furniture. Where possible, remove everything including beds, sofas, and cupboards. If a full clear-out isn’t practical, move large furniture to one side of the room and work in halves. Be sure to remove rugs, lamps, or electronics from the floor.
Vacuum the carpet thoroughly before starting. This reduces the release of dust, hair, or allergens into the air when cutting and lifting the material. Also, open windows to ventilate the room throughout the process.
Once the space is clear, take precautions to protect other areas. Use dust sheets or old blankets at the door threshold to prevent transferring dirt to clean floors. If you’re working upstairs, clear your landing and stairs to carry carpet strips out without tripping hazards.
Preparation checklist:
- Remove all furniture, rugs, and items from the floor
- Disconnect electronics and lift wiring that may run under the carpet
- Vacuum the entire carpeted area
- Place dust sheets over adjacent flooring or thresholds
- Ensure good lighting and open windows
- Create a clear route from the room to your exit door
Also, double-check for any nails, screws, or floor-mounted fittings like radiator pipe covers. These should be removed or worked around carefully. Skipping the prep stage often leads to injuries, damage, or delays.
Taking just 30 to 45 minutes to fully prepare the space can save hours later and ensures a safer, cleaner, and more manageable carpet removal job.
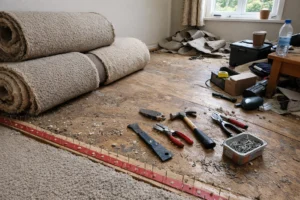
What Tools And Safety Gear Do You Need For Carpet Removal?
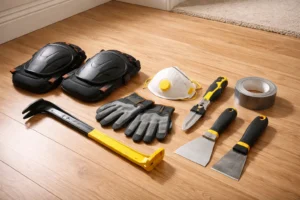
The right tools and protective gear can make or break your carpet removal experience. In the UK, most of the essential equipment can be found at local DIY stores or ordered online. Using the correct tools means faster work, cleaner results, and fewer injuries.
Start with a heavy-duty utility knife for cutting the carpet into manageable strips. A pry bar or crowbar is ideal for lifting gripper rods and pulling up corners. You’ll also need cut-resistant gloves, a dust mask, and knee pads for comfort when working on the floor. A vacuum cleaner helps keep dust under control throughout the process.
Recommended tool and gear list:
| Essential Tools & PPE | Purpose |
| Utility knife (with spare blades) | Cutting carpet and underlay |
| Pry bar or crowbar | Lifting carpet corners and gripper rods |
| Cut-resistant gloves | Protecting hands from nails and staples |
| Dust mask or respirator | Filtering out allergens and fibres |
| Knee pads | Reducing strain from floor work |
| Vacuum cleaner | Cleaning before and during removal |
| Duct tape | Securing rolled carpet and underlay |
Optional tools:
- Staple remover (for older timber floors)
- Floor scraper (for adhesive or glued carpet)
- Steam cleaner (for loosening glue)
- Adhesive remover (chemical or natural solution)
Don’t overlook safety. Even thin carpets can hide sharp pins or staples. If you’re removing carpet in poor lighting or tight spaces, make sure you also have a torch or work light available. With everything set up in advance, the job becomes far less stressful and physically demanding.
What Is The Correct Order To Remove Carpet, Underlay, And Fixtures?
Carpet removal should follow a logical order to ensure no damage to your subfloor or surrounding structures. Whether you’re dealing with a glued, tacked, or gripper rod installation, the layer-by-layer approach remains consistent.
Start with the Carpet
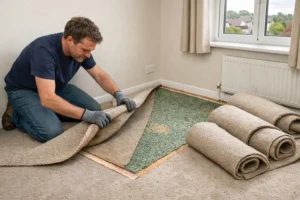
Begin in one corner of the room. Use pliers or your pry bar to lift the edge of the carpet. Once loosened, pull back approximately two to three feet. Flip the exposed carpet section over and use your utility knife to cut along the backing. Cutting from the reverse side gives you better control and less fraying.
Roll each strip into a tight bundle and secure it with duct tape. Repeat this step in manageable sections across the entire room. Aim for strips around 1 metre wide, especially if the carpet is thick or waterlogged.
For glued carpets, warm the area with a steam cleaner to loosen the adhesive. Slowly lift the carpet using a floor scraper, applying consistent pressure.
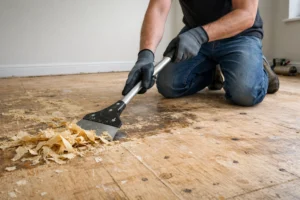
Remove the Underlay
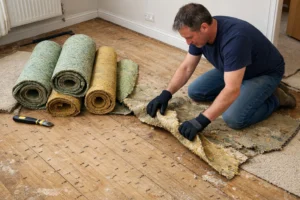
Once the carpet is fully removed, the underlay will be visible. Underlay is usually stapled, nailed, or glued to the subfloor.
- Start at one edge of the room and pull up the underlay in strips
- Cut it into sections similar to the carpet for easier disposal
- Remove any remaining staples using pliers or a staple remover
- Bag each strip or roll and secure with tape
Check if your underlay is reusable, it may be in decent condition. However, it’s usually advisable to replace underlay to get the best out of your new flooring.
Gripper Rod Removal
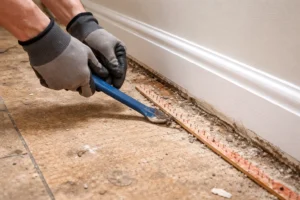
Gripper rods are fixed around the room’s perimeter with nails or adhesive and contain sharp tacks that held your carpet in place.
- Slide a pry bar under the rod
- Apply steady pressure to lift without splintering wood floors
- Remove all nails or pins carefully
- Place rods into a box or heavy-duty bag for disposal
Always wear gloves during this step to avoid cuts from exposed tacks.
Clean Adhesive Residue
If glue or old adhesive is left behind, you’ll need to clean it before laying new flooring.
- Use a scraper or chemical adhesive remover
- Steam cleaners also help loosen hardened glue
- Clean the area with a damp cloth once glue is lifted
Removing all residue ensures a smooth, even subfloor and prevents problems during reinstallation. By following this order, carpet, underlay, grippers, adhesive, you make the process logical, safe, and thorough.
What’s The Complete Carpet Removal Checklist For UK Homeowners?
To simplify your project, here’s a fully structured checklist to guide your entire carpet removal process from beginning to end. Use this list to track your tools, steps, safety actions, and disposal plans. You can print it out or save it digitally for easy reference.
| Stage | Action Point |
| Tool Setup | Utility knife, pry bar, gloves, mask, scraper, tape, vacuum |
| Safety First | Wear gloves, dust mask, and knee pads |
| Room Preparation | Remove furniture, vacuum carpet, ventilate room |
| Carpet Removal | Lift, cut, roll, and tape carpet strips |
| Underlay Removal | Lift underlay, remove staples, roll and secure |
| Gripper Rods | Pry up rods, handle nails carefully, dispose safely |
| Adhesive Cleaning | Use scraper or cleaner, wipe floor thoroughly |
| Disposal Prep | Book council pickup, skip, or take to recycling centre |
| Final Floor Check | Smooth surface, check damp, fill gaps if needed |
Following this checklist will help ensure a smooth, structured, and safe carpet removal process for any UK homeowner or landlord.
How Can You Safely Handle Tack Strips, Staples, And Carpet Dust?
Tack strips and carpet staples are among the most dangerous elements during removal, yet they’re often underestimated. Sharp nails and barbed grippers can easily puncture skin, while rusted staples can cause infections. Old carpets also release significant amounts of dust, which may contain pet hair, pollen, and even mould spores in damp properties.
Protect yourself with these tips:
- Always wear thick gloves when handling carpet edges or gripper rods
- Use a flat pry bar to lift strips without applying direct force
- Place removed strips into a sealed box or rigid plastic bin to avoid injuries from poking nails
- Use a staple remover or pliers to extract sharp pins left in wooden subfloors
- Keep a dust mask or respirator on, especially if your carpet is over 5 years old or has been exposed to moisture
- Run a vacuum over each section after lifting to remove dust before you move on
It’s easy to get a small cut or inhale fibres if you’re rushing through the job. Take your time, clean as you go, and dispose of all hazardous materials responsibly. Safety is just as important as efficiency.
What Are The UK’s Carpet Disposal And Recycling Options?
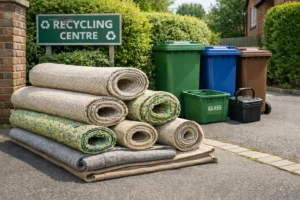
After carpet removal, the next challenge is figuring out how to dispose of it responsibly. Carpets are classified as bulky waste in the UK and cannot be placed in your general household bin. Fortunately, there are several eco-friendly and legal disposal routes available.
Your main options include:
- Council Bulky Waste Collection: Most UK councils offer a bulky waste service where they’ll collect carpet and underlay from your kerbside. The cost varies by region but generally starts around £50. Some councils have waiting lists, so it’s best to book in advance.
- Household Waste Recycling Centres (HWRCs): Many local tips or recycling centres accept carpet and underlay. It’s usually free for residents, but you should check in advance whether your centre accepts this type of material and in what quantity.
- Skip Hire: Ideal if you’re doing a full renovation or removing flooring from multiple rooms. Expect to pay £150–£250 depending on the skip size and your location. Make sure the hire company accepts carpet waste.
- Private Waste Removal Services:‘Man and van’ rubbish clearance services can take your old carpet on the same day. Prices range from £70 to £100 for a standard room. Ensure they are licensed waste carriers to avoid fly-tipping fines.
- Reuse and Donation: If your carpet is in good condition, consider listing it on Freecycle or Gumtree. Animal shelters, garages, or DIY hobbyists may repurpose offcuts for various projects.
Choosing the right disposal method depends on the amount of carpet, your budget, and your timeline. Plan ahead to avoid last-minute stress and illegal dumping.
When Is It Better To Hire A Professional Carpet Removal Service?
There are times when it makes sense to leave carpet removal to the experts. If your carpet is glued down over a large area, installed on stairs, or you’re working with tight corners and heavy furniture, professional services are well worth the cost.
Carpet removal can also trigger allergies or respiratory issues, especially in older homes with dusty or damp carpet. Fitters often offer removal as part of a new carpet installation package, making it more cost-effective. Professionals can complete the job faster and handle all disposal legally and safely.
If you lack time, tools, physical ability, or patience, paying between £60 to £100 for full removal and disposal is often the best route. Just confirm in advance that the price includes both lifting and environmentally responsible disposal.
How Much Does Carpet Removal Cost In The UK?
Understanding the cost of carpet removal helps you budget properly, whether you’re doing it yourself or hiring professionals. Costs can vary based on the room size, carpet type, condition of the underlay, accessibility, and your location within the UK.
Here’s a breakdown of common carpet removal and disposal costs:
| Service Type | Typical UK Cost |
| DIY Carpet Removal Tools | £25 – £50 (one-time purchase) |
| Council Bulky Waste Collection | £30 – £60 per pickup |
| Recycling Centre (Drop-off) | Free (confirm with local authority) |
| Private Waste Collection | £70 – £100 per room |
| Skip Hire | £150 – £250 (depending on size) |
| Removal Only (Professional) | £2.50 – £6 per square metre |
| Removal + Disposal via Fitters | £3.50 – £4.50 per square metre |
| Removal from Stairs or Glued Carpet | Additional £20 – £40 labour surcharge |
Cost Factors to Keep in Mind:
- Room Size: Larger spaces cost more due to the volume of carpet and time needed.
- Carpet Type: Thick or glued-down carpets take more effort to remove.
- Furniture: Heavy or immovable furniture can add £50–£100 in extra labour.
- Disposal Included: Some services include disposal; others charge separately.
- Location: Prices are typically higher in London and the South East than in the North or rural areas.
Real-World Example:
For a 17m² living room, expect to pay
- DIY: Around £30 for tools, plus your time
- With Professional Removal and Disposal: £60–£100
- With Fitting Package (Retailer): £3.74 × 17m² = £63.58
If you’re already buying new flooring, check whether removal and disposal are included. It may be more economical and convenient than arranging them separately. Comparing quotes from local professionals and checking council services can help you find the most cost-effective solution.
What Are The Most Common Mistakes When Removing Carpet?
DIY carpet removal is straightforward, but avoidable mistakes can lead to delays, injuries, or unnecessary expense. Many homeowners rush the job or skip crucial steps.
Common mistakes include:
- Cutting carpet strips too large or heavy to lift
- Forgetting safety gear like gloves or dust mask
- Leaving behind staples or gripper rods, causing injuries later
- Ignoring glue residue, which affects new flooring installation
- Skipping underlay removal when it’s no longer fit for purpose
- Disposing of carpet improperly, risking fines
Planning ahead and following each step methodically avoids these issues. Take your time, work in sections, and never assume what’s underneath the carpet, always check for wiring or pipework before using tools near the floor.
What Should You Do After Removing Carpet To Prep The Floor?
Once the carpet, underlay, gripper rods, and staples are removed, your focus shifts to preparing the subfloor. A well-prepared floor is essential for any new flooring to perform correctly and last longer.
Step-by-step subfloor preparation:
- Clean Thoroughly: Use a vacuum and damp mop to remove dust, fibres, or dirt left behind. This prevents issues with adhesives or uneven surfaces.
- Check for Staples and Nails: Scan the entire area for any hidden staples, nails, or gripper rod pins that may have been missed. Use pliers to remove them.
- Scrape Off Adhesive: If glue remains, use a floor scraper or adhesive remover. Steam can also help loosen it on concrete floors.
- Inspect for Damage: Look for signs of damp, mould, or rot, especially in wooden subfloors. Fix any problems before continuing.
- Level the Floor: Use a filler compound to fix cracks or low spots. If you’re installing laminate or vinyl, this step is crucial to avoid bumps and creaks.
- Allow to Dry: Let everything dry out completely before fitting your new flooring. Moisture can ruin new carpet, laminate, or wood.
With proper preparation, your new floor will look better, last longer, and be easier to install.
Conclusion
Removing carpet might seem intimidating at first, but once you understand the process, it becomes a highly manageable DIY project. With careful preparation, the right tools, and a step-by-step method, you can take up old carpet and underlay safely and efficiently.
From lifting the first corner to preparing the subfloor for new flooring, every stage matters. Don’t forget to plan for responsible waste disposal. If you prefer not to handle the disposal yourself, using a trusted rubbish removal service can save time and ensure compliance with UK waste regulations.
Whether you choose to do it all yourself or bring in professionals for the trickier parts, this guide ensures you have the information you need to make the best decision for your home. By removing your carpet the right way, you’re setting the stage for a cleaner, more modern, and refreshed living space.
FAQs
How long does it take to remove carpet from a single room?
For an average-sized UK room, carpet removal typically takes 1 to 2 hours. This includes cutting, rolling, and clearing the underlay and gripper rods.
Can I reuse my old underlay after removing the carpet?
You can reuse underlay if it’s in excellent condition and not damaged. However, most flooring experts recommend replacing it for best performance and hygiene.
Is it safe to remove carpet if I have allergies?
Carpet removal can release dust, allergens, and pet dander into the air. Always wear a dust mask or respirator and ventilate the room well.
Do all carpets have gripper rods underneath?
Most carpets in UK homes use gripper rods for installation. Some may also be glued down or stapled, especially on stairs or concrete floors.
What should I do with old carpet if I can’t take it to a recycling centre?
You can book a council bulky waste collection or hire a licensed waste removal service. Alternatively, list clean carpet offcuts online for donation or reuse.
Is it difficult to remove glued-down carpet?
Yes, glued-down carpet is more difficult and time-consuming to remove. You may need a floor scraper, steam cleaner, or adhesive remover for best results.
Can I install new flooring immediately after carpet removal?
Only if the subfloor is clean, dry, and level. Any adhesive residue, moisture, or uneven patches must be dealt with first for proper installation.


